Conda 安装及配置
安装文件下载
Linux 下推荐安装 Miniconda3 (基于 Python3),Python2 已 EOL。
Miniconda3 下载链接
安装步骤
1 |
chmod +x Miniconda3-latest-Linux-x86_64.sh |
按照提示接受 the license terms 并设置安装路径,默认为 ~/miniconda3/。
最后可选择将 conda 加入用户环境变量 PATH,也可安装后手动配置,方法为:
1 |
echo "export PATH=$PATH:~/miniconda3/bin" >> ~/.bashrc |
Conda 配置
Conda 源配置(添加 bioconda,r,conda-forge 以及 anaconda 源),参考此文章。
jupyter 安装及配置
jupyter 安装
1 |
conda install jupyter |
jupyter 配置
配置 jupyter 密码并允许远程访问:
生成配置文件
1 |
jupyter notebook --generate-config |
生成密码
打开 ipython,创建一个经过加密的密码:
1 |
In [1]: from notebook.auth import passwd |
复制生成的密文 sha1:...
修改默认配置文件
1 |
vim ~/.jupyter/jupyter_notebook_config.py |
修改如下内容:
1 |
c.NotebookApp.allow_remote_access = True |
启动jupyter notebook
1 |
jupyter notebook |
远程访问
此时应该可以直接从本地浏览器访问 address_of_remote:8888 进入 jupyter 的登陆界面。
建立 ssh 隧道
如果登陆失败,则有可能是服务器防火墙设置的问题,此时最简单的方法是在本地建立一个ssh隧道:
1 |
ssh username@address_of_remote -L127.0.0.1:1234:127.0.0.1:8888 |
直接访问 localhost:1234 就可访问远程的 jupyter 了。
以下为 conda 环境中特定语言 kernel 安装配置方法。
安装 jupyter 使用的 python 可直接被 jupyter 调用,不需额外配置。为了使用其他语言或者新环境中的某种语言,需要单独安装该语言的 jupyter kernel 供 jupyter 调用。
新建 conda 环境并安装 Python3
1 |
conda create --name jupyter python=3.7 # 此处环境名 jupyter 可自定义 |
激活新环境
1 |
conda activate jupyter # 进入新建的conda环境,使用 conda deactivate 退出 |
安装 Python ipykernel
安装依赖包
1 |
(jupyter) $ conda install notebook ipykernel |
安装 python kernel
1 |
which ipython # should show ~/miniconda3/envs/jupyter/bin/ipython |
kernel 文件保存在 ~/.local/share/jupyter/kernels/python37。
此时安装的是新环境中 ipython 所属的 python 3.7 (~/miniconda3/envs/jupyter/bin/python) 为 jupyter kernel。
其他位置或环境的 python 可用相同方法安装为 jupyter kernel。
安装 R IRkernel
安装 R 3.6
1 |
(jupyter) $ conda install r-base=3.6 |
安装依赖包
进入 R 环境:
1 |
(jupyter) $ R |
安装 R kernel 包:
1 |
install.packages("IRkernel") |
安装 R kernel
进入 R 环境,执行
1 |
> IRkernel::installspec(name = 'ir36', displayname = 'R 3.6') |
kernel 文件同样保存在 ~/.local/share/jupyter/kernels/ir36
其他位置或环境的 R 可用相同方法安装为 jupyter kernel。
登陆 jupyter 测试
首先退出 conda 环境:
1 |
conda deactivate |
启动 jupyter
1 |
jupyter notebook |
会自动读取 ~/.local/share/jupyter/kernels/ 下安装的 kernel 文件。
使用 jupyter lab
现在推荐使用 jupyter lab
安装
1 |
conda install jupyterlab |
使用
1 |
jupyter lab # 代替 jupyter notebook 的新式交互环境。 |
在浏览器中输入密码登陆后会显示已经注册的 kernel,如下:
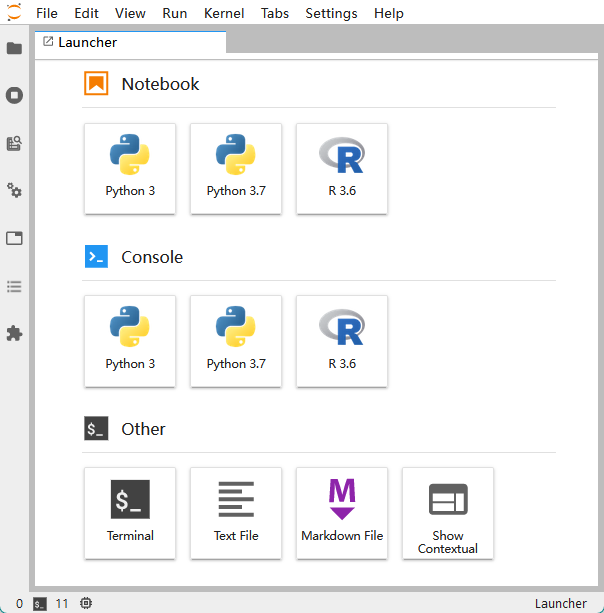
其中,Python 3 为 jupyter 所属 python (~/miniconda3/bin/python) 默认生成的 kernel, 另外一个 python 和 R kernel 为手动安装的 kernel。点击即可新建特定语言的 notebook 开始使用。
Enjoy p( ^ O ^ )q !
Writing Enriches Life.